Cinematic Titles Text Effect: A Practical Guide to Studio-Quality Typography
When you need text that feels as heavy and polished as a professional movie poster, the Cinematic Titles Text Effect offers a dedicated approach to achieving that look. This collection of Photoshop templates is built around simulating forged metal, anamorphic flares, and iridescent chrome sheen—elements that separate blockbuster title cards from standard typography. But before committing to any design asset, it helps to examine how this effect compares to other methods, where it excels, and where it may fall short for your specific project.
What Defines the Cinematic Titles Text Effect
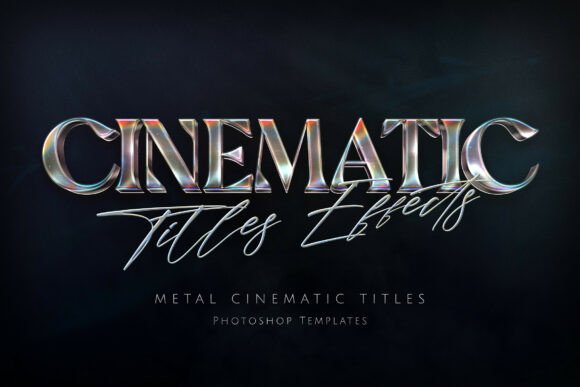
At its core, this effect is a set of high-resolution Photoshop files that apply 3D metallic textures, realistic bevels, and light reflections to your text or logos. The result aims to mimic the dramatic presence of a silver-screen title—think sci-fi film openings or fantasy book covers. The key differentiators are precision and fidelity: the templates are rendered at 4500 x 3000 pixels, and the materials simulate polished metal with subtle dust textures and colorful sheen. This level of detail is rare in simpler text effects or online generators, which often produce flat, generic results.
Because the effect is built around anamorphic lens flare and chrome highlights, it creates a sense of depth and motion that static text lacks. For designers working across print and digital, this means the title retains its impact whether it is displayed on a theater marquee or a streaming thumbnail.
How It Compares to Alternative Approaches
To evaluate whether this effect suits your workflow, it helps to consider three common alternatives: building metallic text manually in Photoshop, using online text effect generators, and relying on 3D software for full-render typography.
Manual design in Photoshop—using layer styles, bevels, gradients, and custom brushes—gives you full control but demands significant time and expertise. Even experienced designers may spend hours dialing in the right highlights and shadow placements. The Cinematic Titles Text Effect shortcuts that process by providing pre-built materials and lighting setups. The tradeoff is flexibility: you can adjust the templates, but you are working within a preset structure. If your project requires highly custom lighting or a specific texture not included, manual work might still be necessary.
Online text generators offer speed and ease, but they typically output lower-resolution images with limited customization. Many lack transparency support or fail to render chrome sheen accurately. For a one-time social media graphic, a generator may suffice. But for print-ready book covers or merchandise mockups, the resolution and material quality of the Cinematic Titles Text Effect become essential. The premium product ensures your typography appears crisp on large-format displays, whereas web-based tools often introduce pixelation or unrealistic reflections.
Full 3D software like Blender or Cinema 4D can produce true 3D typography with infinite control over lighting, materials, and camera angles. This is the gold standard for high-budget projects, but it demands a steep learning curve and longer render times. The Cinematic Titles Text Effect occupies a middle ground: it delivers a convincing 3D look within a 2D Photoshop environment. For designers who need professional results without learning a new application, this is a practical compromise. However, if your workflow already includes 3D software, you might prefer the absolute control that solution offers, especially for animated titles or complex scenes.
Strengths and Fit: Where This Effect Shines
The Cinematic Titles Text Effect is particularly suited for projects where dramatic, high-stakes typography is the focal point. Consider these scenarios:
- Movie posters and trailers: The templates are designed to mimic anamorphic lens flares and metallic lettering—exactly what blockbuster campaigns use to establish tone. A single title treatment can sell the genre and scale of a film.
- Gaming logos and stream headers: Guild emblems, game titles, and streaming overlays benefit from the mythic, forged feel. The iridescent chrome sheen works well with fantasy or sci-fi themes, making icons look embedded in metal.
- YouTube thumbnails and intros: In a crowded feed, a title that reflects light and depth stops the scroll. The effect provides that scroll-stopping quality without resorting to flashy, cheap-looking elements.
- Book cover art: Sci-fi, fantasy, and thriller novels often use metallic, embossed titles to signal genre. The high-resolution templates handle both digital and print formats, so the spine and cover remain sharp at full size.
- Merchandise and apparel graphics: Streetwear looks and band merchandise frequently rely on aggressive, heavy typography. The materials in these templates translate well to T-shirt prints or vinyl cuts, though you should test the contrast on fabric colors.
A realistic example: a designer creating a poster for an indie sci-fi short film needs a title that looks expensive but has a small budget. Using the Cinematic Titles Text Effect, they can mock up three variations in an hour, each with distinct colors and lighting angles. The same task manually might take a full day, and the 3D approach would require learning animation software. In this case, the effect saves time while delivering the required professional polish.
Tradeoffs and Limitations to Consider
No single tool fits every need, and the Cinematic Titles Text Effect has clear boundaries. Understanding these helps you decide when to use it and when to look elsewhere.
Software dependency: The effect requires Adobe Photoshop CC. If you use other software such as Affinity Photo, GIMP, or Canva, these templates are not directly compatible. You would need to manually replicate the layers or convert the files, which may diminish the time savings. For teams standardized on Photoshop, this is not an issue, but for mixed-workflow studios, it introduces friction.
Learning curve within Photoshop: Although the effect automates most of the heavy lifting, you still need basic familiarity with layers, layer styles, and smart objects. Applying the effect to your own text involves replacing placeholder layers and adjusting size and position. If you are new to Photoshop, there is a short ramp-up. The included PDF with font links and instructions mitigates this, but it does not substitute for foundational knowledge.
Customization boundaries: The four included PSD files offer variation—likely different angles, textures, or color schemes—but you are limited to what is pre-built. You can tweak curves, add gradient maps, or combine files, but major changes to the material structure are complex. If your brand requires a specific brushed metal grain or an off-axis reflection not in the pack, you may need to supplement with custom work.
Resource intensity: At 4500 x 3000 pixels with multiple layer effects, the files can be heavy on system memory. Working on older hardware may result in lag, especially when previewing reflections or applying adjustments. For large batch projects, consider using simpler placeholders until final renders.
Print vs. web concerns: The resolution is excellent for both print and digital, but the effect’s realistic lighting relies on a dark or contrasting background for maximum visibility. On white or pastel surfaces, the metallic highlights may wash out. You should test the template against your intended background—whether it is a movie poster background or a T-shirt color—before committing.
When This Effect May Not Be the Right Choice
There are situations where the Cinematic Titles Text Effect is overkill or misaligned with project goals:
- Minimalist design: If your brand or project calls for clean, flat typography—like corporate presentations or modern app interfaces—heavy metallic effects can feel out of place. Subtle typography may be better served by simple layer styles or custom fonts.
- Web UI and small screens: For button text or navigation labels, three-dimensional effects often reduce legibility at small sizes. The metallic reflections can create visual noise on tight interfaces. Reserve this effect for hero elements like headers or splash screens.
- Animated text: The effect is static. If you need rotating, flying, or dynamically illuminated titles for video, you would need to composite multiple frames or use a tool with keyframe support—Photoshop timeline templates or, more likely, After Effects or 3D software.
- Budget constraints: As a premium product, it carries a cost. For designers who only make one or two text treatments, free resources like Photoshop’s built-in layer styles or community-made .asl files may be adequate. However, these often lack the polish and consistency of a professional pack.
Making an Informed Decision
Choosing the Cinematic Titles Text Effect comes down to balancing time, quality, and flexibility. If your projects regularly call for metallic, high-drama typography and you work within Photoshop, this pack offers a reliable shortcut to results that would otherwise require advanced skills or expensive software. The included PSD files and documentation reduce guesswork, letting you focus on color grading and composition rather than texture engineering.
For those who value absolute customization—perhaps a game studio with a unique art direction or a designer who enjoys building effects from scratch—the templates serve as a strong foundation but may need supplementation. In such cases, think of the pack as a productivity tool rather than a turnkey solution. You can deconstruct the layer effects to learn how the materials are built, then adapt them to future projects.
Another factor is consistency. If you are producing a series of posters, thumbnails, or book covers, using the same effect across titles ensures a cohesive visual language. The templates provide a stable baseline, so variations come from layout and typography choices rather than ever-changing material settings. This reduces decision fatigue and speeds up production.
Finally, consider the output context. For digital displays—streaming plates, social media posts, or video thumbnails—the high resolution can be downscaled without quality loss. For large-format print, the 4500 x 3000 pixel canvas gives room for crisp edges and fine metallic speckles. If your primary use is merch screen printing, verify that the subtle dust textures and gradient transitions will reproduce well on fabric; you may need to simplify the file to avoid ink bleeding.
Practical Tips for Getting the Most Out of the Effect
To maximize value from the Cinematic Titles Text Effect, treat it as a starting point rather than a final destination. Experiment with blending modes—try overlay, screen, or multiply on the chrome layers to match your background. Adjust the hue and saturation of iridescent sheen to align with your color palette. Use the provided templates as style guides, and build your own library of custom materials from the techniques you learn.
Stacking multiple PSD files can create complex composites. For example, one file might handle the primary title, while another contributes a subtle reflection on a floor plane. Because the files are smart object–based, replacing the text content is straightforward. Keep your fonts organized—the included PDF link list helps, but having a curated selection of bold, serif, or sans-serif faces will speed up trials.
If you encounter performance issues, flatten preview copies before making massive adjustments, and only work with full-res layers on the final revision. Also, test your title at different sizes early in the process; a metallic bevel that looks powerful on a poster may read as busy on a thumbnail.
Final Considerations
The Cinematic Titles Text Effect carves out a specific niche: it brings a movie-studio aesthetic into the Photoshop environment without requiring a dedicated 3D pipeline. For designers producing hero typography for entertainment, gaming, and merchandise, it offers a pragmatic balance of quality and efficiency. For those needing extreme customization, animated sequences, or ultra-light file sizes, alternative methods may prove more suitable.
By understanding the effect’s strengths—its metallic realism, high resolution, and pre-built flare materials—and its tradeoffs—software lock-in, customization boundaries, and resource needs—you can decide whether it fits into your creative toolkit. The best choice depends on your project’s demands, your available time, and your willingness to learn either a full 3D application or manual layer techniques. In many cases, this effect provides a shortcut to results that would otherwise take hours or days, making it a practical resource for professionals who need studio-quality titles on a working schedule.