Isometric Arcade Game Cabinet: Integrating a Vector Asset into Your Creative Workflow
When you work with digital assets day in and day out, you quickly learn that not every file is built the same way. Some illustrations look great on screen but fall apart when you scale them. Others are locked into a single format, forcing you to rebuild or re-license every time you need a different output. The Isometric Arcade Game Cabinet is a detailed vector illustration that sidesteps those pain points entirely. It presents a classic arcade machine in a clean isometric perspective, blending the nostalgic charm of vintage gaming culture with a modern geometric touch. For anyone who produces merchandise, prints, or digital content, understanding how to slot an asset like this into an existing process can save hours of rework and open up new creative possibilities.
This article walks through what this illustration is, where it fits into a practical workflow, and how to use it before, during, and after a project. Whether you are a graphic designer building a product line, a small business owner creating branded merchandise, or a hobbyist making stickers for a local event, the following sections will help you integrate the Isometric Arcade Game Cabinet smoothly into your routine.
What the Isometric Arcade Game Cabinet Brings to the Table
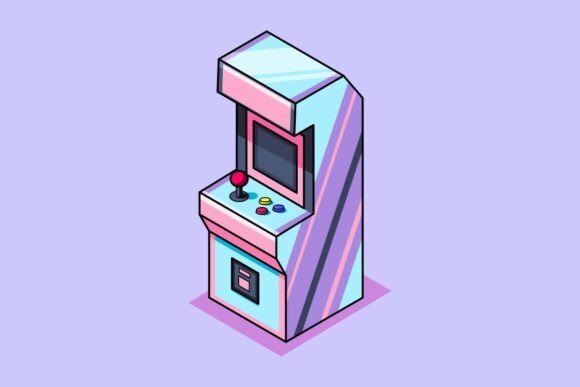
At its core, this asset is a vector illustration of an arcade cabinet drawn from a fixed isometric angle. That means every line and curve is calculated to maintain a consistent 30-degree perspective, giving the artwork a three-dimensional feel without the complexity of a full 3D render. The style is bold and vibrant, deliberately retro-inspired but executed with clean, modern geometry. The result is an image that reads clearly at small sizes—think a one-inch sticker—and maintains its impact when blown up to poster scale.
The asset comes in four formats: SVG, EPS, JPG, and PNG. Each format serves a distinct purpose in a production pipeline. SVG and EPS are resolution-independent vector formats, ideal for scaling, editing, and color adjustments. JPG and PNG are raster outputs, ready for immediate use in mockups, web content, or print proofs. Having all four means you can move from concept to final product without converting files manually or losing quality.
Where It Fits in a Broader Process
In a typical creative workflow, assets like this sit in the implementation phase. You have already defined your project scope—maybe it is a line of t-shirts for a gaming convention or a set of stickers for a retro-themed café. You have chosen a visual direction. Now you need a core graphic that can be adapted across multiple products. The Isometric Arcade Game Cabinet becomes that anchor. Because it is a standalone illustration rather than a full composition, you have the freedom to place it on different backgrounds, combine it with typography, or crop it for specific formats.
Using the Asset Before Project Kickoff
Before you begin a new project, you likely spend time gathering inspiration and testing visual concepts. The Isometric Arcade Game Cabinet can serve as a reference point during this planning stage. Open the SVG in your vector editor and examine how the artist handled isometric angles, shading, and color balance. Even if you plan to create your own custom illustration later, studying this asset helps you internalize techniques that make isometric artwork read clearly.
You can also use the files to build quick mood boards. Drop the PNG into a presentation slide alongside photos of arcade interiors, neon signs, and pixel art. Seeing the asset in context helps you decide whether the retro-geometric direction aligns with your brand or event theme. If it fits, you have saved yourself the time of commissioning a custom illustration from scratch. If it does not quite fit, you still gain clarity on what visual direction to pursue next.
Preparation and Compatibility Checks
Before the project starts, verify that the formats you need are compatible with your editing tools. SVG files work natively in Adobe Illustrator, Inkscape, Affinity Designer, and most web-based vector editors. EPS files are widely supported in professional design software but may require a specific import setting in older programs. JPG and PNG are universal. By confirming compatibility upfront, you avoid mid-project format conversion delays.
If you plan to use the asset in a web or app interface, test how the SVG renders at different screen densities. Because it uses clean vector paths, it should remain sharp on retina displays. For print, open the EPS or SVG and confirm that the color space matches your output requirements. The asset is likely built in RGB for screen use, so you may need to convert it to CMYK if you are producing offset-printed merchandise. Take a moment to check the file’s color palette against your printer’s gamut, especially if the illustration contains highly saturated neon tones.
Integrating the Asset During the Active Work Phase
Once the project is underway, the Isometric Arcade Game Cabinet becomes a production asset. This is where its multi-format nature pays off. Use the SVG or EPS for any design work that requires scaling, color changes, or element extraction. For example, if you want the arcade cabinet on a t-shirt but need to resize it to fit a left-chest print, the vector format lets you scale without degradation. You can also adjust individual colors to match your brand palette, change the cabinet’s accent lines, or remove the background entirely.
For mockups and client previews, the PNG or JPG versions are faster to drop into templates. If you are showing a sticker sheet layout or a poster composition, the raster files save you the step of exporting from the vector editor every time you update the layout. Keep both vector and raster versions synced: make your edits in the vector file first, then export updated PNGs as needed. This ensures your master file remains editable and resolution-independent.
Workflow Example: Designing a Merchandise Line
Imagine you are producing a small batch of products for a retro gaming pop-up event. Your lineup includes a T-shirt, a poster, a sticker sheet, and a tote bag. Here is how the Isometric Arcade Game Cabinet flows through the process:
- T-shirt: Open the SVG in your vector editor. Duplicate the cabinet, scale one version for a large back print and a smaller version for a front pocket print. Adjust the color of the cabinet’s side panels to match the shirt color. Export the final vector art as a PDF for the screen printer.
- Poster: Use the same SVG file. Place the cabinet centrally, add a neon glow effect behind it using a combination of blurred vector shapes and a dark background. Export a high-resolution PNG for print testing.
- Sticker sheet: Import the EPS into a layout template. Create multiple copies of the cabinet, each at a different scale. Add a white offset stroke to each copy so they cut cleanly as individual stickers. Export a combined PDF with cut lines.
- Tote bag: Take the PNG version and use it in a mockup generator to visualize placement. Once approved, return to the vector file, simplify any overly complex paths to reduce screen-printing costs, and export the final art.
In this workflow, the same core illustration serves four distinct products. You never redraw the cabinet or search for a different angle. The asset’s consistency ensures that every item in the line feels cohesive.
Post-Project and Long-Term Use
After the project is complete, the Isometric Arcade Game Cabinet remains useful for archival, repurposing, and derivative work. Store the SVG and EPS files in a well-organized asset library with clear metadata tags. Include notes about the color palette, perspective angle, and any modifications you made. This makes it easy to find the asset months or years later when you want to create a sequel product or update an existing design.
Because the illustration is vector-based, you can revisit it for entirely different contexts. The same arcade cabinet that appeared on a t-shirt for a 2024 event might become a social media graphic, a web icon, or a wall decal for a gaming lounge. The isometric perspective is visually distinctive enough to stand alone, but flexible enough to work alongside other geometric assets. If you later purchase additional isometric illustrations, check whether they share the same projection angle. Consistent perspective across a series of assets makes composite scenes look cohesive without extra tweaking.
Quality Control and Consistency
One practical concern when using any pre-made asset is maintaining visual consistency across your product line. The Isometric Arcade Game Cabinet has a specific color scheme and shading style. If you combine it with other illustrations, ensure that the lighting direction and saturation levels match. In the isometric style, light typically comes from the top-left or top-right. Check the asset’s shadow placement and apply the same logic to any custom elements you add.
For long-term use, keep a master file that documents your color adjustments. If you shifted the cabinet’s red accents to a custom orange for brand consistency, write that change down. When you produce new merchandise months later, you can apply the same color transformation without guessing. This is especially important if multiple people on your team handle the asset. A simple style guide entry—mentioning the asset name, format preference, and any color overrides—prevents drift.
Practical Implementation Tips
The following observations come from working with vector assets in real production environments. They will help you get the most out of the Isometric Arcade Game Cabinet without unnecessary trial and error.
- Start with SVG for editing, EPS for legacy compatibility. SVG is more universally editable across modern software, while EPS remains a safe fallback for older print workflows. When in doubt, keep both.
- Use layers to separate elements. If your vector software allows it, open the SVG and examine whether the asset is built with grouped objects. If the cabinet’s screen, buttons, and base are separate paths, you can animate them or recolor them independently.
- Plan for cut lines in sticker production. If you are making die-cut stickers, add a contour stroke around the entire cabinet. A 0.5pt white stroke outside the shape helps the cutting machine recognize the boundary without overlapping the artwork.
- Test print at actual size early. Because the isometric perspective includes angled lines, thin details like joystick shafts or button edges may become less visible at very small print sizes. Print a test at the intended scale and adjust stroke weights if necessary.
- Combine with typography carefully. Isometric art has a strong directional pull. If you add text, keep it flat and aligned to the horizontal plane, or rotate it to match the isometric grid. Avoid mixing multiple perspective systems in the same composition.
Organizing the Asset for Efficient Access
If you manage a library of digital assets, folder structure and naming conventions matter. Place the Isometric Arcade Game Cabinet in a subfolder clearly labeled by format, style, or theme. A practical structure might look like this:
Assets / Illustrations / Isometric / Arcade-Cabinet /Arcade-Cabinet_SVG.svgArcade-Cabinet_EPS.epsArcade-Cabinet_PNG.pngArcade-Cabinet_JPG.jpgArcade-Cabinet_Color-Guide.txt
This naming convention makes the asset discoverable through search and prevents confusion when you have multiple isometric assets. Adding a color guide text file is a small habit that pays off when you revisit the asset after a long gap.
Final Observations on Integration
The Isometric Arcade Game Cabinet is not just a single-use graphic. It is a modular piece of visual language that you can insert into a wide range of projects. Its value comes from the combination of format flexibility—vector and raster—and a style that sits squarely at the intersection of retro nostalgia and modern geometry. By treating it as a production asset rather than a finished artwork, you retain control over how it looks in every context.
Whether you are printing a one-off sticker for a friend’s birthday or rolling out a full merchandise line for a commercial event, the same principles apply. Plan your format needs early, keep your vector master file editable, document your color decisions, and test outputs at real scale. These habits turn a good asset into a reliable component of your workflow, project after project.